-
 Pick up from the Store
Everyday from 9 AM to 7 PM
-
 ARAMEX DELIVREY
2-3 Days
Total fees when checkout
Dual Axis PS2 Joystick Module

Your data is always protected
Sale_coupon_15
40,00EGP
In stock
In stock
 Pick up from the Store
Everyday from 9 AM to 7 PM
 ARAMEX DELIVREY
2-3 Days
Total fees when checkout
 Return within 14 days
Payment Methods:

| Pin No. | Pin Name | Description |
| 1 | Gnd | Ground terminal of Module |
| 2 | +5v | Positive supply terminal of Module |
| 3 | VRx | Voltage Proportional to X axis |
| 4 | VRy | Voltage Proportional to Y axis |
| 5 | SW | Switch |
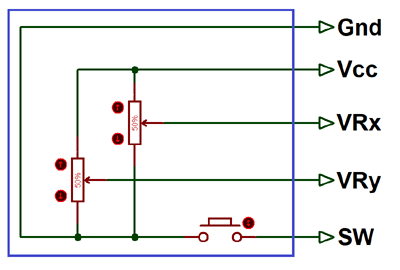
The below image is the?internal diagram of a Joystick Module. It consists of two?Potentiometer, each for one axis (X and Y). Both 10k potentiometer are independent to move in their particular direction. SW (Switch) pin is connected to a push button internally.
When we listen the word ?Joystick? we think of Game controllers. If we talk about Electronics there are many useful application of Joystick. These type of module are mostly used in?Arduino?based DIY projects and Robot Control. As we know, the module gives analog output so it can be used for feeding the analog input based on direction or movement. It can also be connected to a movable camera to control its movement.
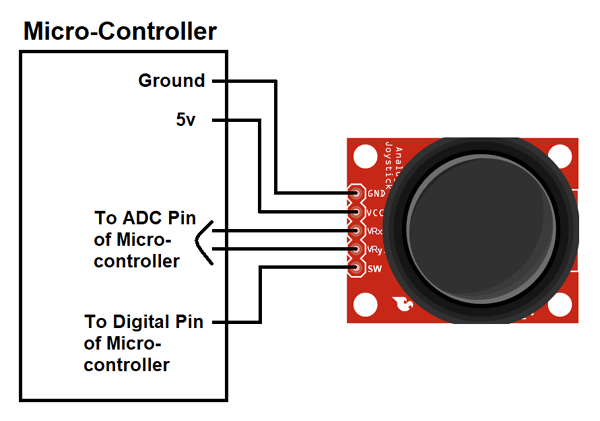
We can use a Joystick Module with Arduino, Raspberry Pi and any other Micro-controllers. We just have to connect the axis Pins VRx and VRy to the ADC Pins of the micro-controller. If you want to use the switch then connect it to the digital Pin of the Micro-controller. Follow the below block diagram to connect Joystick Module with Microcontroller.
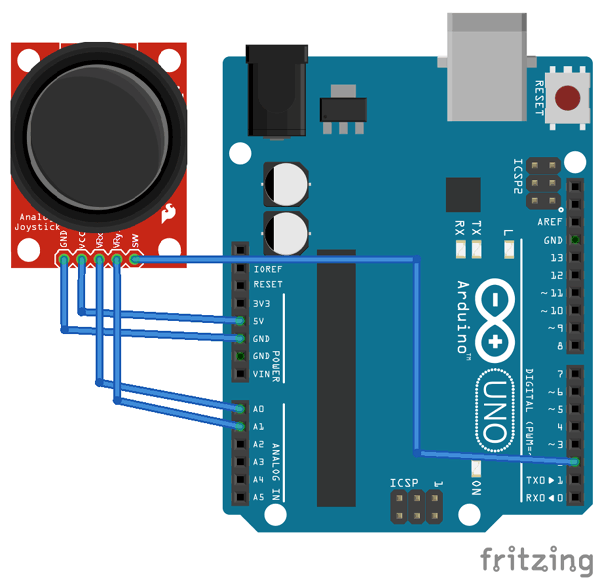
As used in many projects, the interfacing diagram of?Joystick Module with the Arduino?is given below. It helps you to connect the joystick Module with Arduino and get the analog output based on the direction of movement of Joystick Knob.
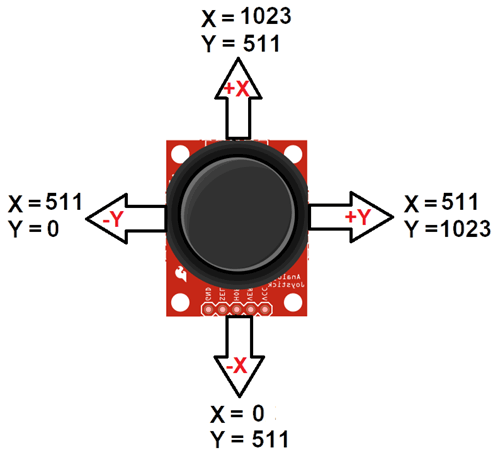
After Interfacing Joystick Module with the Arduino, we will get the analog output. The output range is fixed for each direction. The below image shows, the value of analog output for X and Y axis based on the movement of Joystick Module in all four directions (+X, -X, +Y, -Y). You will also get some analog value when moving the knob diagonally.
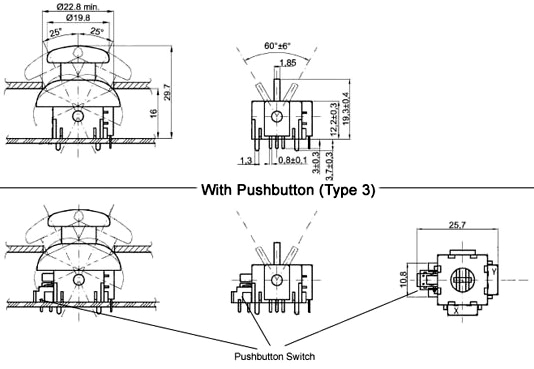
Datasheet:
Related Products:
 3D Printers
 Air | Fluid Control
 Arduino | Shields
 Arduino Boards
 Batteries | Accessories
 Boxes | Enclosure
 Breadboards | PCB’s
 CNC | 3d Printer Parts
 CNC Machines
No account yet?
Create an Account